- Published on
Free CDN for WordPress Website with Cloudflare R2
- Authors
-
-
- Name
- pekhota
-
In the previous post, we talked about optimizing your WordPress storage by storing data in an AWS S3 bucket. This works well if your infrastructure is hosted on Amazon AWS. However, suppose you’ve just started your WordPress journey and are using a different hosting solution, such as DigitalOcean, Vultr, or another provider. In that case, you may wonder how to set up a CDN for your WordPress website without incurring additional costs. Good news: there’s a straightforward, completely free solution that allows you to have a separate bucket for images and efficiently deliver media content through a CDN, significantly boosting your site’s performance and user experience.
Why Use Cloudflare as a CDN for Your WordPress Website?
Cloudflare offers a robust CDN solution for WordPress websites, complemented by security, DNS management, and DDoS protection. Approximately 20% of the internet, including websites, mobile apps, APIs, AI workflows, and corporate networks, runs through Cloudflare’s network. As you can see, in addition to CDN services, Cloudflare offers further security and DDoS protection. Additionally, Cloudflare offers other services comparable to those found in various cloud providers, such as R2, which is an AWS S3-compatible cloud storage optimized for typical web workloads, including streaming videos, storing, and processing images.
Benefits of Cloudflare CDN for Your WordPress Website
Please note that all the features discussed below are included in Cloudflare’s free tier.
Cost-free domain hosting
Cloudflare allows you to connect your domain and manage DNS settings for free. By default, all DNS records you add are proxied through Cloudflare proxy servers, which gives you several benefits at once:
- HTTPS protocol support is available by default. No more Let’s Encrypt certificate pain and certificate renewal procedures. It just works, and you don’t need to worry about it. Your app can handle an 80 HTTP port internally, while Cloudflare does everything else for you.
- Security – Your server’s IP address is never exposed to the world. The less it’s exposed, the better.
- DDoS, bots, spam protection – Cloudflare proxies automatically scan the traffic and detect any suspicious activity. This reduces any potential risks associated with your application.
- Automatic DNS integration with internal services, such as R2 – AWS S3-compatible cloud storage.
While all of that already sounds great, the point of the article is to help you save money on cloud storage for your WordPress website. Because of the benefit #4, we can now discuss another thing.
Cost-free static hosting.
Cloudflare has its own R2 storage, which is an AWS S3 API-compatible alternative to Amazon’s S3 Object storage service. By default, they provide 10 GB of data storage, with no limits on traffic https://www.cloudflare.com/en-gb/lp/pg-cloudflare-r2-vs-aws-s3/ for free. Easy integration with DNS and a rich free tier allow you to create a static CDN for your website in just a few clicks. Additionally, considering the ease of integration with WordPress, it’s a must-have to be considered.
How to?
Well, it all sounds great. Let’s dive into the step-by-step practical guide to setting up Cloudflare R2 as a CDN for your WordPress website.
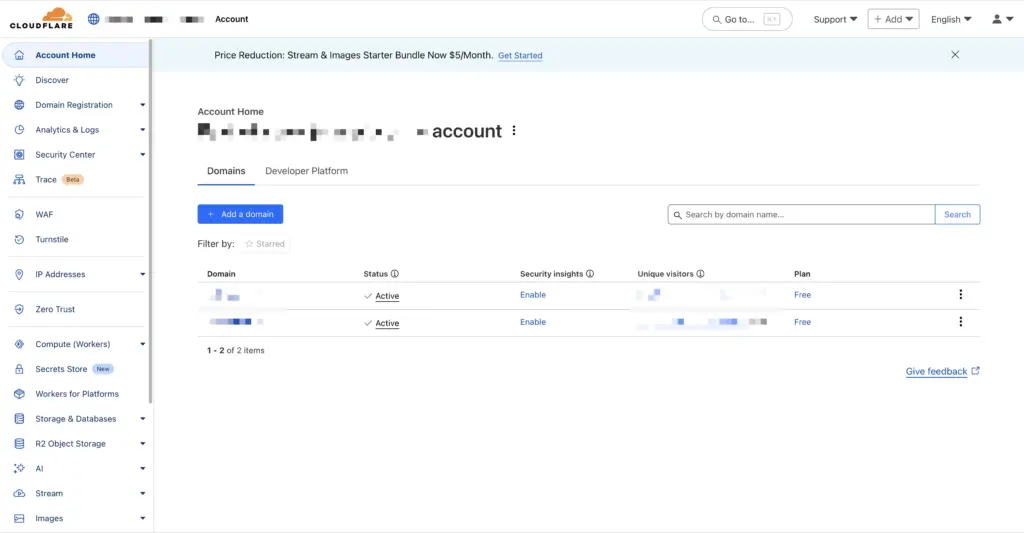
The first step is to create a Cloudflare Free account. It will allow you to create a domain entity for your website, where you can see instructions on how to set up the DNS to migrate through Cloudflare. Go to Cloudflare’s sign-up page and create an account. This is a direct link to do that, which is available here (no ads or affiliates): https://dash.cloudflare.com/sign-up. Feel free to search for it on Google if you’d like.
Once you have the account, you can create a new domain record. It’s not precisely a domain; it’s a record inside Cloudflare that represents a domain entity. Type the name of your real domain to have that created. This step assumes you have already registered your domain name using Namecheap, GoDaddy, or any other service. You can also do that on Cloudflare.
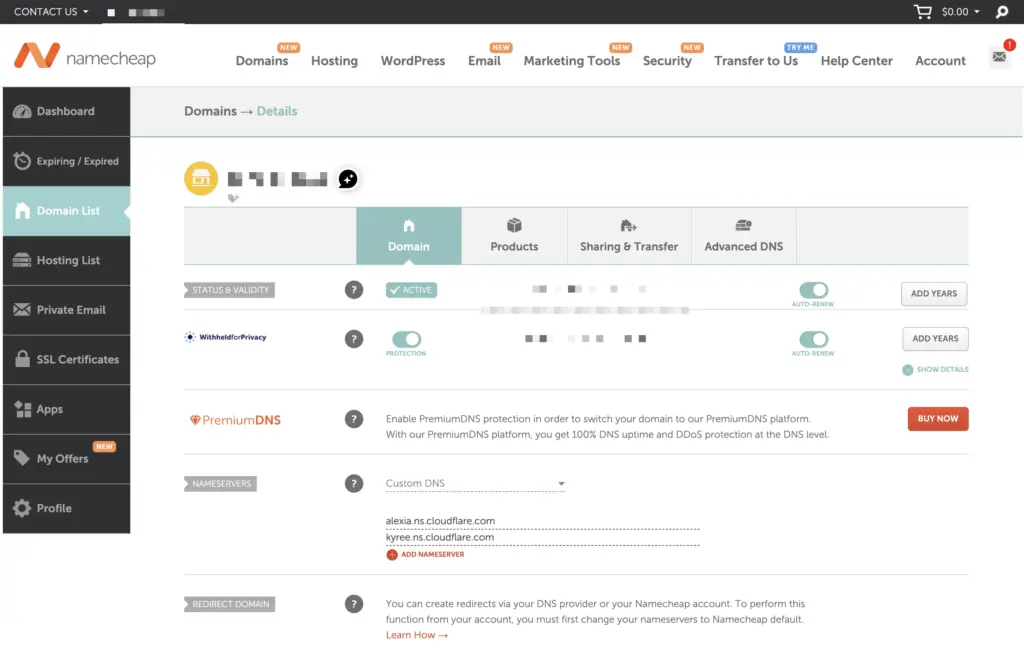
When the domain record is created, you need to connect your existing domain on the page of your registrar to Cloudflare so that the service can manage DNS records for you. It’s quite a simple process. Just follow the instructions provided by Cloudflare. This means that you need to update the nameserver records on the admin page of your original domain registrar. Usually, you need to specify two nameserver records:
- alexia.ns.cloudflare.com
- kyree.ns.cloudflare.com
However, you can copy them directly from the website. The records above are provided for demonstration purposes only.
Once everything is connected, you should be able to notice that Cloudflare has found the records and can now do DNS management.
Now, go directly to the DNS settings and add an A-type record there. An A-type record allows you to connect a domain directly to your server. Don’t forget to proxy the record.
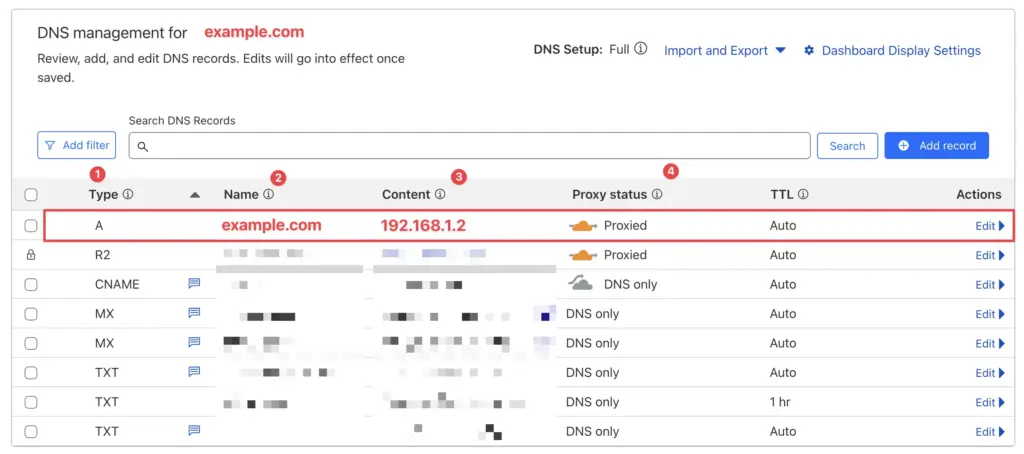
At this point, if you have already deployed your website to the server, it should appear in the browser with the proper domain and HTTPS support. You can type https://you-website.com and it should work.
We can start implementing R2 Storage for your website.
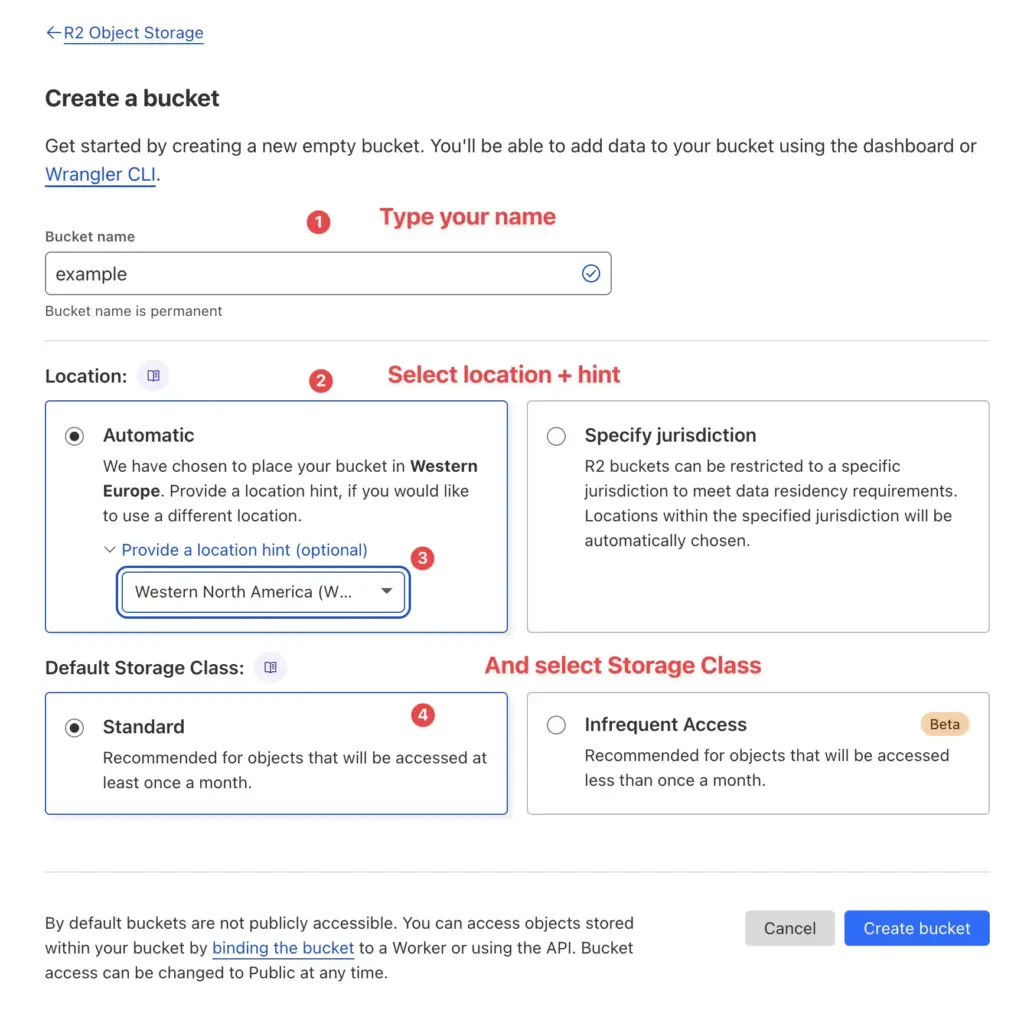
Go to your Cloudflare’s main page/dashboard and scroll down the left menu until you see R2 Object Storage. Go to Overview and press Create Bucket. It’s a simple process. Type your name, select location (don’t forget to provide a hint – it can help with better location optimisation), and select Storage Class.
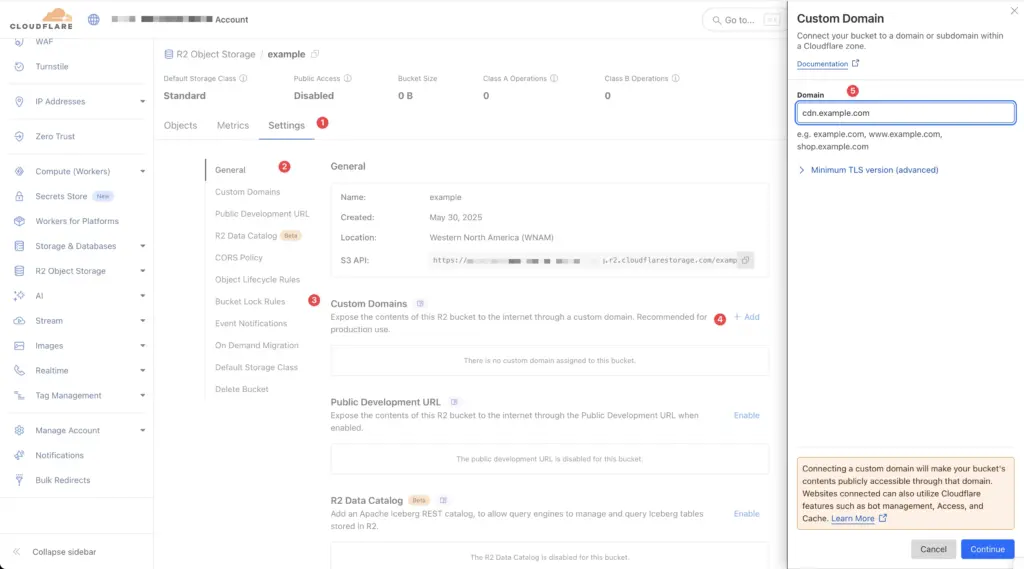
Once your bucket is set up, enable a custom CDN domain (like cdn.example.com) to serve media files efficiently from your WordPress CDN. This will allow you to distinguish your media content from other website requests clearly. Once the domain is selected, press Continue to review and create the DNS records.
You can now review that everything works by accessing your domain’s DNS settings. You will see a new DNS record called R2 added to the account.
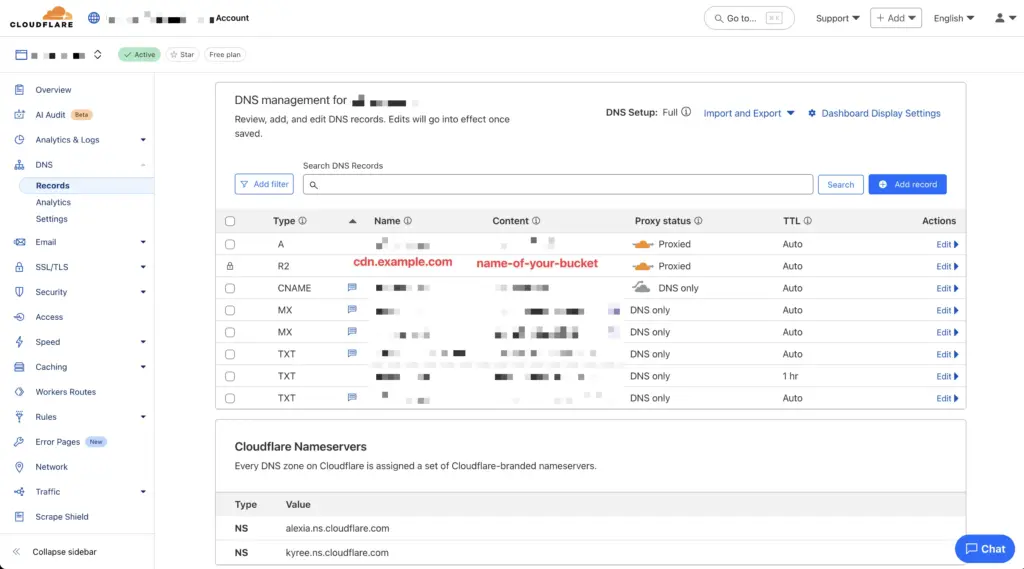
Feel free to go back to your R2 bucket page and upload a test file. You would be able to see it using your new CDN URL, something like:
https://cdn.example.com/test.jpg.
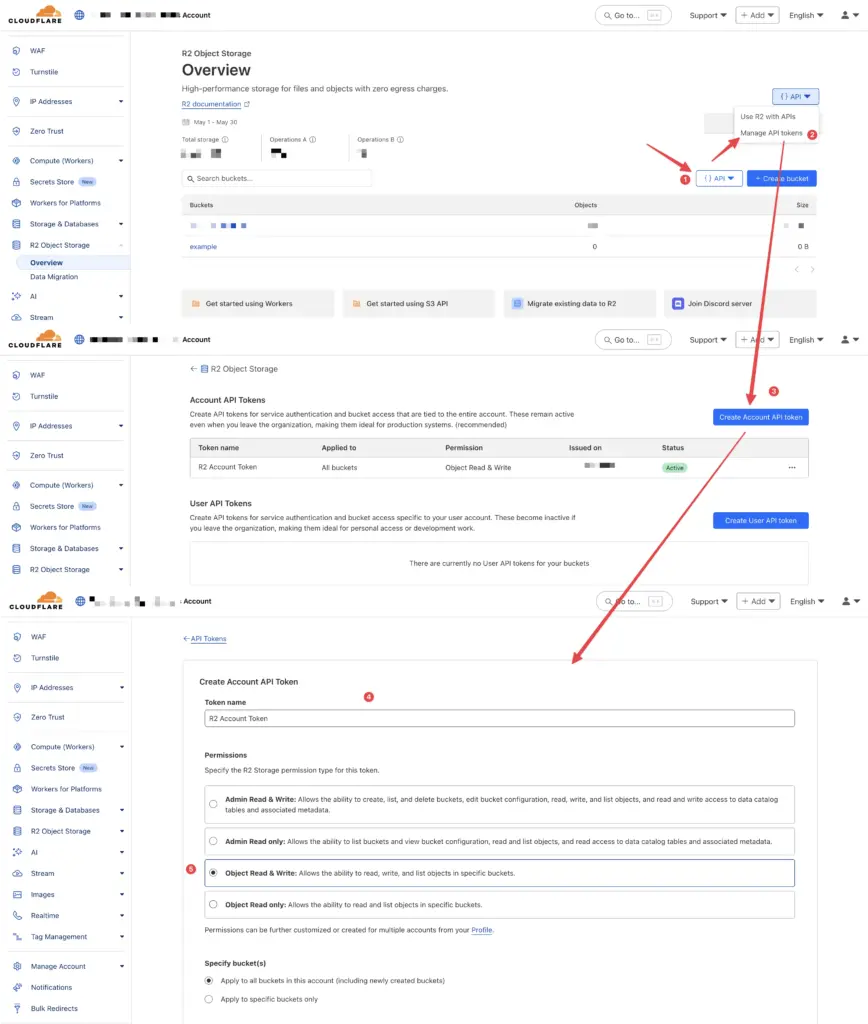
Once all of that is ready, go back to your R2 settings and create API Keys to access your bucket programmatically. You need to press the API dropdown button and select Manage API Tokens. On the next page, click Create Account API Token, and on the API Token form, enter a unique token name so you can distinguish it from others if you have more than one. Permissions – select ‘object read and write’ as needed, and ensure your website can upload images as well. Once it’s done, save the key and secret as you need them to set up the image uploading plugin on the website. The whole process is demonstrated in the picture below.
Once you press create, you will see a success page with all the credentials you need to access the storage programmatically. Be careful, the secret key is available only once, on that page. You won’t be able to see it again. You need to create another token in case you lose this one. So, make sure you saved it to a safe place. The success page will have the following look.
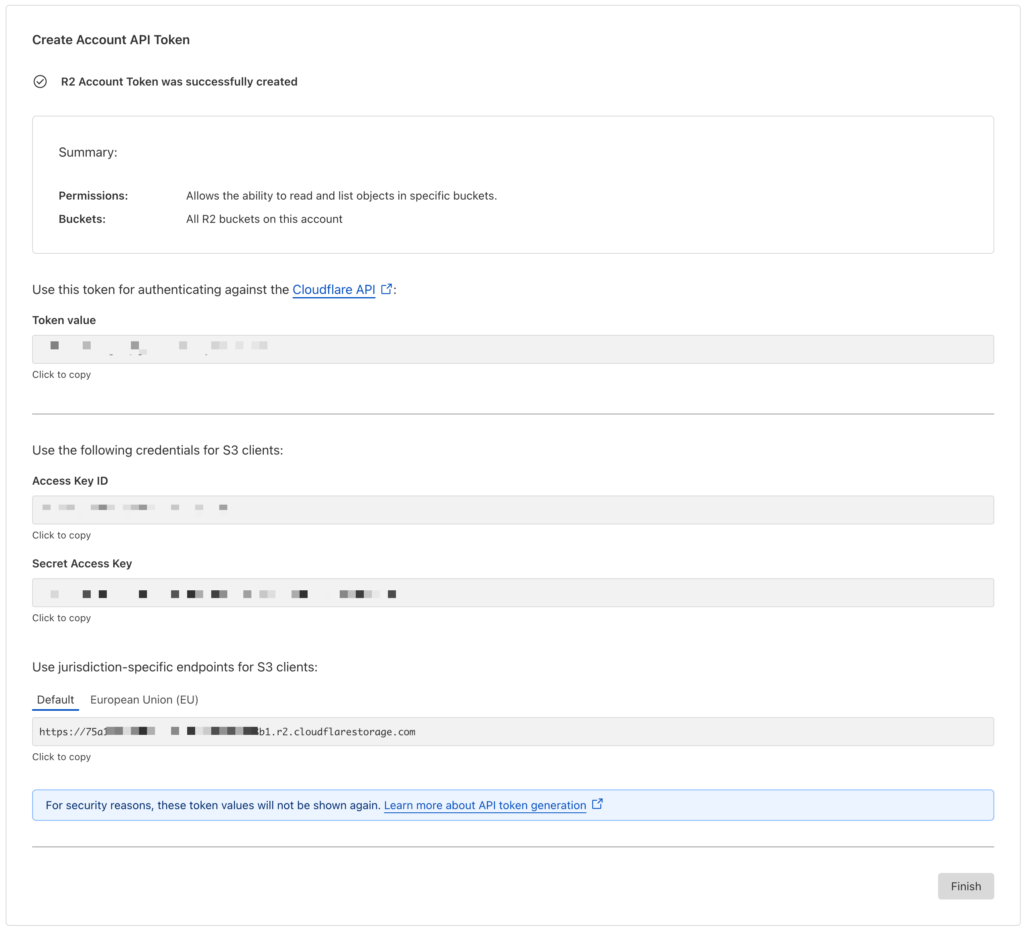
I’ll repeat it: make sure you copied all of that so you can have easy access to it.
Now let’s integrate your WordPress site with Cloudflare R2, completing your free WordPress CDN setup.
The first plugin you will find to connect WordPress to S3-compatible storage is WP Offload Media by WP Engine. However, this is not what we are gonna use here today. The first reason is that, by default, the plugin supports AWS S3 and DigitalOcean providers. To add extra support, you can perform some manual work. It requires downloading and modifying another plugin, called WP Offload Media Tweaks. For more details, please visit: https://github.com/deliciousbrains/wp-amazon-s3-and-cloudfront-tweaks/tree/master. However, there is a much easier, more straightforward solution that will fit your needs quite well.
What you need to do is install the humanmade/s3-uploads plugin. Here is a link to the GitHub repo of this plugin: https://github.com/humanmade/S3-Uploads. They recommend installing it via Composer. It’s assumed that you are managing your project using https://roots.io/bedrock/docs/composer/ or a similar tool. However, you can still download the repository as a zip file and extract it manually to your plugins directory. No big deal at all.
It has no UI, so its management will require some work on your part in the code.
The first step is to define the following constants in your code. Consider the function.php file or other autoloaded code parts. Here are the constants you need to add:
define("S3_UPLOADS_ENDPOINT", "https://your-url.r2.cloudflarestorage.com"); // your r2 endpoint, you
define("S3_UPLOADS_BUCKET", "bucket-name"); // your bucket name
define("S3_UPLOADS_BUCKET_URL", "https://cdn.example.com"); // your cdn name you made from the previous screen
define("S3_UPLOADS_REGION", "auto");
define("S3_UPLOADS_KEY", env('S3_UPLOADS_KEY')); // your access key id from the R2 tokens
define("S3_UPLOADS_SECRET", env('S3_UPLOADS_SECRET')); // your secret access key
Once the constants are there, there is one last piece. You need to add one WordPress hook to fix S3 support for R2 for the S3-uploads plugin.
You can do that by adding the following code to your functions.php or any other autoloaded code:
/**
 * https://jackwhitworth.com/blog/cloudflare-r2-buckets-with-wordpress/
 * fix for humanmade/s3-uploads plugin
 * @param $params
 *
 * @return mixed
 */
function tw_s3_uploads_s3_client_params( $params ) {
    $params["endpoint"] = S3_UPLOADS_ENDPOINT;
    $params["use_path_style_endpoint"] = true;
    return $params;
}
add_filter( "s3_uploads_s3_client_params", "tw_s3_uploads_s3_client_params");
If you need to upload existing data that is already in your media library, you can do that manually by using tools like:
– AWS CLI
– rclone
– native R2 CLI – wrangler cli
Your website is now successfully utilizing Cloudflare R2 as a free CDN for your WordPress website, enhancing its speed and overall performance.
I hope you found this guide helpful! If you have any questions or require additional assistance with your WordPress CDN setup, please let me know in the comments.